Tie Dye Fun

Last weekend I finally had a chance to pull out the Tulip Custom Dyeing Kit that I won on the ILoveToCreate.com Blog way back in September of last year. I am embaressed that it has taken me this long to get around to trying it out but this past year has been a very hectic and busy one for me
I do all sorts of projects with my 12 year old daughter all the time. My 7 year old niece Rylee is visiting from Georgia. She doesn't get to do much in the crafting department so I knew I had to try this kit out while she was here.
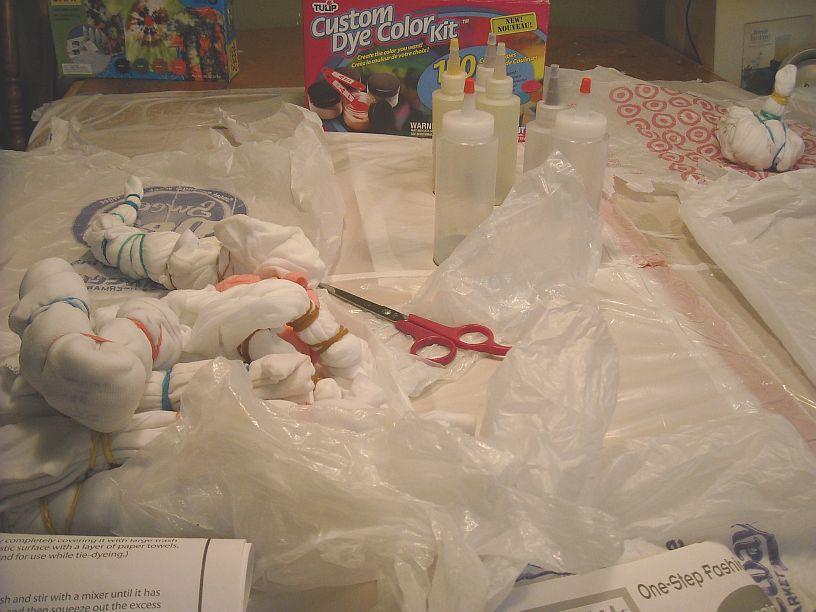
Over the past couple of months I have been collecting supplies for one big day of dying. I used mostly recycled shirts. Some of them were bought at the local Goodwill and believe it or not I actually found some at the Dollar Tree. I am assuming that the shirts from the Dollar Tree were seconds but I have not found a thing wrong with them.
I also bought some onsies for the two babies in the family.

About a month ago I bought a Fashion Tie Dye kit on clearance at Target. When I was thinking about writing up this blog post I initially did not plan on doing a comparison review type post but since I used dye from both of the kits and I found there to be a very big difference between the two I decided I had to include a review in my post.
When I bought the kit on clearance I bought it because it included the plastic squeeze bottles. I had been having a hard time finding the bottles and I wanted to use them with the Tulip kit. The price was right so I bought it. All together I had bought 2 tie dying kits. The one shown on the table in the background of the photo did not get used.
I did read the instructions from each of the three kits to see if there was any differences in the instructions. There was. The cheaper kits called for the dye setting up for 12 hours. The Tulip kit called for only one hour.
But I did not follow the instructions exactly in the Tulip kit. The Tulip kit instructions called for a bath type dying where you fill a bucket and soak your tshirt or fabric in the bucket of dye water. I was going to be doing the squeeze bottle method and even though I had looked on the website a few times in the past I could not find any instructions for mixing ratio or setting up/ soaking time using the squeeze bottle method. I am sure it is there somewhere but I just didn't find it.
So I just winged it.

Rylee
Now with the Tulip Custom Dye Kit you get a pamphlet that gives you the instructions on how to mix 150 colors of dye from the 4 colors of dye that is included in the kit. Four round refillable plastic jars to hold your base colors and two plastic measuring spoons, one a teaspoon and one a 1/2 teaspoon.
In the phamplet you pick the color you want based on a color wheel and it shows you how many teaspoons of each color to mix to get the color you want.
Wow is all I can say. How much fun is that? I have looked over that pamphlet at least 6 times since I received the kit trying to figure out which colors I would use when I finally got around to trying out the kit.
Getting Ready
First I taped a couple of plastic garbage bags to my kitchen table. This is one messy project but so worth it. I had planned on doing this outside in the yard on a card table but it was just too hot to be standing in the direct sunlight.
The one kit came with soda ash. You soak the items to be dyed in a mixture of soda ash and water for 20 minutes. This is suppose to make your dye permanent. When I am dying with natural dyes I do the same thing with Alum. Here is a link to some fabric I dyed with oak leaves.
I soaked all of the items and then twisted and tied them up.

This was my first attempt at tie dying and it will not be the last. I had so much fun!
Some of the items I twisted in the middle to form a spiral and some of the items I folded and pleated. I was dying 12 items in total and once they were twisted and wrapped with rubberbands its hard to tell what they were. A few things I kept seperate because I planned on trying a certain tie twist effect and I wanted to make sure I had the right thing in hand when I whipped out the dye bottles.
Along with the the first layer of plastic trash bags that I taped to my table I also cut open some small plastic grocery bags to lay each shirt on it as I applied the dye.This worked out really well because when I was done applying the dye to each piece I just carefully rolled it up into the bag for the time it needed to soak.
I am sorry to say once I started working with the mixed dyes I couldn't use my camera. There was too much dye puddling on my work surface.
Something I learned...........If you are going for a certain look or don't want any other dye colors showing up on your shirt do not mix your dye powders on the same surface you plan on dying on. I was very carefull that none of the dry particles fell as I was measuring the Tulip dye into the plastic bottles but once I laid a wet t-shirt down I saw dots of dye start to bloom on the wet fabric. Now that didn't make a difference to me because we were using a bunch of different colors on our shirts. But that may not be the case for you.
My daughter and my niece each applied the dyes to their own shirts and a few others. All of the instructions said to soak up any extra dye that puddled so it wouldn't be absorbed by the wet material and ruin your pattern. I didn't do that but was very careful when we rolled to shirts up into the plastic bags to soak over night. None of the patterns were ruined and if they were we couldn't tell because all of the shirts turned out awesome as far as we were concerned.

I left all of the shirts soaking over night. Even though the Tulip brand didn't need it we had mixed both brands of dye on most of the items so I let them sit overnight also. Plus I did not want to be rinsing in two batches. I wanted to rinse everything at once.
The next morning I could hardly stand to wait so I started snipping the rubber bands and rinsing right away. The first shirt I unrolled and rinsed blew me away. I couldn't believe how beautiful they turned out.

After rinsing I hung everything outside on a make shift clothes line so they wouldn't drip dye all over my house. There is two more pieces you can't see in this pictures.

This is a light weight dish towel I bought at the dollar tree. I am not sure what the material is but it feels like a light weight muslin.

It may find it's way into one of my art quilts if I can find the strength I will need to take a scissor to it.

And this is my favorite one of all of them and a total hit with my daughter and grand daughter Hailey. I found this white shirt at the Good Will. We are going to look for a white pair of Capris so I can dye them to match.
On this blouse I used nothing but the Tulip dye. And I noticed a big difference between the two type of dyes. For one thing when I rinsed everything the other dye brand bled and bled. And is still bleeding dye after being hung to dry, tossed in the dryer for 30 minutes, washed in the washer and dried in the dryer again. I also noticed some fading.
With the Tulip dye I only had to rinse for a few minutes and the water was running clear. To me that tells me that the dye is staying in the fabric and not being washed away making it more more permanent.
The second thing I noticed with the Tulip dye is that the colors are deep and luscious. The picture above does not do this dye justice. I was in a hurry to get a picture so I could get this post written.
I am very happy with the Tulip dyes and will stick with them for my future dying projects. I am already collecting more white shirts to dye. Beware this could be addicting. I need to find or make some white stretchy head bands for the babies and dye them to match the shirts and onsies!


Comments
at one time was kinda addicted to this art work.
:)