Posts

I've Been Tagged

Image
Linda over at Purple Tomatoes tagged me. Thank you Linda.I think LOL..... Linda has had a big week in the world of Blogger because she is also a featured Artist over at Belinda's Crazy Art Girl's Musings . Go check it out. This is my first tag and it looks like a hard one. I'm suppose to list 6 weird or interesting things about myself. I might have a hard time coming up with six things but I'll try. Then after I list 6 things about myself I have to find another six people to tag. Here are the official rules taken from Linda's blog: list six weird/interesting things about yourself and then tag a further six bloggers (by going to their blogs and telling them to check out your blog post related to this) to keep the momentum going. List your six tagged bloggers at the bottom of your post. OK let's see what I can come up with. #1 I am weird. Everyone who knows me thinks I am weird. Why do they think I am weird you ask. Well just because I do things like make paper f...

I Love Making Backgrounds

Image
I've come to the conclusion that I love making backgrounds! Making the background is my favorite part of a project. All of the things I have been working on lately have been swaps that I have joined on my various Yahoo groups. The above picture is of my backgrounds for the 3 x 3 swap that Belinda is hosting on her CollageComposition group. I am happy with the backgrounds. I LOVE the backgrounds........... but now I don't know how to finish them off. It's after I have a background made that the problems set in for me when I am working on a swap. Am I having a " PROBLEM?" Or could it be FEAR ? I've noticed that I only have this PROBLEM when I am making something for a swap . Am I having PROBLEMS because my artwork will be judged by someone else when I am particatipating in a swap? Could it be because I know it will not be just one person that will be judging me? It could be a dozen or more people judging my artistic ability in each swap. ARTISTIC........... Ther...

Hailey's Banner

Image
Well this is a first for me. Two posts to my blog in one day......eer well night. I was visiting ArtsyMama's blog and saw her pictures of the cute little dress wall hangings she has made to sell in her Junk Bonaza booth and remembered this banner that I made for my little granddaughter Hailey's bedroom. I had meant to post a picture awhile back when I made it but I forgot. So here it is. The picture isn't very clear. The pink background of the wall did not get along very well with my flash. Hailey turned one year old yesterday! Happy Birthday Grammy's girl!
Image
Today I finished putting together my charm bracelet with the charms I received in the Artysdoll charm swap I participated in a few months ago. A big thank you to Kelly Parker for hosting this great swap. I used seven of my favorite charms from the swap and then added bead dangles and a few of my own charms to finish off the bracelet. The chain I found at my local Joann's. I have plenty of charms left over and can probably make at least 4 more bracelets if that's what I use them for. If you go back to my blog post from May http://alteredbyme.blogspot.com/2007/05/artsydoll-charm-swap-whoo-hoo.html you can see the rest of the charms I received in the swap.

Stamp Carving

Image
I entered the world of hand carved stamps very innocently. While shopping at my local Joann's for some gesso I notice a few items marked on clearance on the same isle. I found the Speedball Block Printing Starter Kit marked down to an unbelievable $5. The kit regularly retails for $17.99 at Joann's. Needless to say I snatched it up and also bought the last two linoleum blocks they had. This is my second attempt at carving linoleum blocks. For my first try I did a simple tree. The blocks are 4 x 5 inches so they make a large size stamp. I read a lot online about carving linoleum before I tried my first stamp. I really thought it would be more difficult then it actually was from all that I read online but I found the linoleum very easy to carve. For the above picture I used three different types of stamp ink. It is amazing the different looks you can get by using different color inks. I'm not sure what I'll use the stamp for. It's too big for an atc. I'll pr...

Mini Triptych Swap

Image
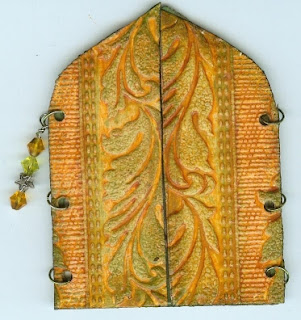
Triptych From Wikipedia, the free encyclopedia A triptych (pronounced "trip-tick," from the Greek tri- "three" + ptychē "fold") is a work of art (usually a panel painting ) which is divided into three sections, or three carved panels which are hinged together. The central panel is the most important one, and this is flanked on either side by two lesser but related paintings. The whole is intended to be greater than the sum of the parts. I've recently joined a mini triptych swap on one of my yahoo groups. Even though I knew what a triptych was I decided to look it up on Wikipedia just to see what I could find . I mostly needed to find the correct pronunciation. I grew up in Brentwood, New York with a family that was all born and raised in Brooklyn. Then as a teenager we moved to South Florida. Sometimes I have the hardest time pronouncing some of the simplest words. Out of no where the New York accent rears it's head and believe me it is not pr...

Tissue Paper Background

Image
Updated 9/1/07 I've had a few people ask me if I allowed each of my layers to dry in between. I did use my heat gun to dry each layer before I moved on to the next one. Thanks for all the great comments! Over the weekend I tried out a background technique I saw in last months issue of Cloth Paper Scissors. I'm very happy with the way it turned out but this took hours to do and I'm not sure if I will do it again. I started out with a sheet of tissue paper that I placed on top of a sheet of freezer wrap on my kitchen counter. Taping the freezer wrap to the counter stopped the wrap from curling and it then laid flat on my counter. I did not cut down the first sheet of tissue paper so my large background piece was as big as a standard sheet of tissue paper. I then glued dictionary and book pages down onto the tissue paper with waterd down elmers glue as my first layer. I then added another layer of tissue paper torn into pieces over the book pages.Then I painted a layer of wa...